Monday 24 October 2016

Flush cache message in SQL Server 2012 error log

FlushCache: cleaned up 3194 bufs with 1259 writes in 148817 ms (avoided 485 new dirty bufs) for db 5:0  average throughput:   0.17 MB/sec, I/O saturation: 92, context switches 765   last target outstanding: 6880, avgWriteLatency 12

 we might have noticed the above message in SQL Server 2012 error logs

When is this message written?

The above message is written in SQL 2012 when it find that long checkpoint  happened, prior to SQL 2012 we need to enable  Trace Flag 3404 to log checkpoint information in error log, So in SQL 2012 it write all checkpoint information's to error log if trace flag 3404 is enabled or if find a Long checkpoint happened

Long Checkpoint:A check point which have exceeded the configured recovery time time interval is called log check point.in my case i am using the default configuration '0' in instance level which is equal to 1 minute,so my checkpoint of database with db id 5 have crossed 1 minutes, to be precise the logged checkpoint took 148817ms (148.8 Sec) where the recovery interval is 60 Seconds

Whats next?if you recovery interval is 60seconds(default) and you are ok if it takes more time the configured then blindly ignore the and carry on with other works
but
What if i am worried about recovery time interval?
So now you have two mainly two options
1)Check your storage performance (in my case i observed I/O bottleneck and Storage administrator increased the IOPs and issue was fixed)
2)Reduce the number of dirty pages which in turn reduce the work of checkpoints

If you are ok with a bit delayed recovery and don't want to see checkpoint messages in your error log then you can increase the recovery time in instance level or SQL 2012 provide option to change in DB levle also, but i would say do a good study and testing before you change the target recovery time

Saturday 13 August 2016

Installing SQL Server using Cofiguration file


Consider you have to install 10 similar instances it will be really boring to repeat the same steps 10 times, in this scenarios  installation using configuration file will be very helpful , configuration file provides the setup all the input which is required to complete the installation so it save a lot of manual inventions and time

Configuration file location can be obtained from the ready to install page in the installation wizard, normally when i do a bulk of implementation i go with GUI installation for the first instance and rest i use the configuration file created in the first installation , we can also have some template configuration files like Database engine only , engine plus analysis service etc so the we can use them for future unattended installation

Configuration file path can be obtained from ready to install page of the SQL Server installation wizard 

We can user the configuration file either from the installation wizard or command prompt as shown below

Configuration file can be chosen from the advanced options in the installation Wizard


Configuration  file can be invoked from command prompt by giving the below command
 
 
Here my setup file is in D:\ drive and configuration file is in E:\ dirve


In the below snap shot i have done an unattended installation


Friday 6 May 2016

Changing location of SQL Server error log file


Changing Sql server error log is a rare task ,but recently we had a request to move sql agent and server log to a  different  drive,so i will share the steps to change  the Sql Server and Sql server agents location log here

Changing SQL Server  error log path


Error log location is a startup parameter, so for changing sql server  error log we need to modify the  startup parameter '-e' in sql server configuration  manager for the instance you want to change error  log path.In the below snip you can see that my error log location is 'D:\ms sql\Program Files\Microsoft SQL Server\MSSQL11.MSSQLSERVER\MSSQL\Log\ERRORLOG' and i am going to update it to 'F:\MSSQL\ERRORLOG' by changing the startup parameter '-e', since it is a startup parameter we need to restart the sql server to reflect the change made


once restarted you can see error log file created in the location we have mentioned , in my case i can see a file called 'ERRORLOG' created in the location F:\MSSQL


Changing Sql Server agent error log path

We have both Tsql option and GUI to change the error log location for sql server agent

1)Using GUI
     
    We can change Sql server agent error log location by changing the error log file name in sql server agent properties

2)Using TSQL

    Sql server agent log location can be changed by executing the below code

     USE [msdb]
     GO
     EXEC msdb.dbo.sp_set_sqlagent_properties @errorlog_file=N'mention log file path here'
     GO

For the change to be reflected we need to restart the sql server agent
we can verify the location by checking agent properties executing the below query

EXEC msdb.dbo.sp_get_sqlagent_properties 

Monday 14 March 2016

Log Truncation and Log shrinking


I see a lot of post in SQL Server forums and groups asking about log truncation and shrinking , when i started my career as DBA this is was on of the main doubt i had , so let me  explain you the difference between log shrinking and log truncation

Log Truncation


We all know that log file is made of multiple Virtual Log Files, transaction log file is a wrap around file, when database is created transactions are logged at the beginning of log file and new log records are added at the end of logical log file towards the end of physical log file ,

So the VLF are reused in a cyclic fashion and the process of making a VLF which is no longer required as free or marking it as reusable is called log truncation

If there is no reusable free space available then Physical log file will expand by adding new VLF if auto growth  is enabled for log file else if  you will get an error 9002 which says that your transaction log is full

When is a log truncated

In SIMPLE recovery model log is truncated by a CHECKPOINT
In FULL and BULK recovery model log is truncated by a LOG BACKUP


So lets have a look at it, i have a database called 'test' it have 10 VLF and i made all the VLF as active by running some transactions , refer the snapshot below , i have used the command dbcc loginfo(  ) to see the the details of VLF inside my log file, here status = '2' means they are active


So why VLF's are not reused ??? Lets check it by using below query

  select log_reuse_wait_desc from sys.databases where name='test'


As the output says its waiting for logbackup to mark VLF's as reusable as i said earlier for a database in full or bulk recovery model a log backup is required to truncate the log file , so here this database is in full recovery model so lets take log backup and see what's going to happen

 BACKUP LOG [test] TO  DISK = N'D:\MSSQL\Backup\test.trn' 

Now lets run dbcc loginfo and could see that 9 VLF is marked as reusable that means log file is truncated
     

Log Shrinking


So log truncation will mark VLF as reusable and this won't reduce the physical size of log file , Shrinking log file is the process of releasing space back to OS from the end of physical log file .
Shrinking  is not suggested to be done frequently until you are sure that your log file won't grow back to the size from which we are shrinking as log growth is an expensive process

So lets see the size of log file of the database 'test' after truncation using the command
dbcc sqlperf(logspace)


Here we can see that log truncation have created free space inside disk so now lets shrink the log file to release unused space back to disk using the below query

USE [test]
GO
DBCC SHRINKFILE (N'test_log' , 0)
GO

now lets check the log file space , you can see that log file have shrink to the initial value


Tuesday 8 March 2016

Enabling Backup compression in server level


Backup compression was one of the attractive feature introduced in SQL Server 2008 Enterprise edition which is available in all edition from SQL Server 2008 R2. Compressed backup saves us both disk space and backup time with a cost of CPU consumption :)

We can take compressed backup by specifying with compression option when we take backup like mentioned below

BACKUP DATABASE [Database name] 
TO  DISK = N'Path' 
WITH COMPRESSION

Instead of specifying  compression  in each backup lets see how to make it default in instance level

1)Using SSMS

   Right click on the Instance name->Database setting and check the compress backup check box and now its done


2) Using script

      We can use the below script to enable backup compression by default in server level

  EXEC sys.sp_configure N'backup compression default', N'1'
  GO
  RECONFIGURE WITH OVERRIDE
   GO

So from now it is not required to specify with compression in each backup and if we want to take a uncompressed backup we need to specify WITH NO_COMPRESSION


So lets  see how much time and disk space compressed backup save, i will show you this my showing the values of a compressed and uncompressed backup i took


So from the above output its pretty clear  how attractive is compressed backup and i would suggest compression  to enabled in instance level as soon as we install server


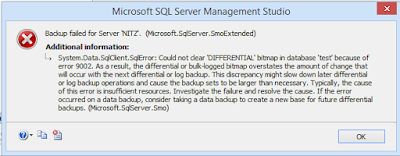
Could not clear 'DIFFERENTIAL' bitmap in database because of error 9002


While i was doing some testing in my server i got an interesting error while taking a full backup


System.Data.SqlClient.SqlError: Could not clear 'DIFFERENTIAL' bitmap in database 'test' because of error 9002. As a result, the differential or bulk-logged bitmap overstates the amount of change that will occur with the next differential or log backup. This discrepancy might slow down later differential or log backup operations and cause the backup sets to be larger than necessary. Typically, the cause of this error is insufficient resources. Investigate the failure and resolve the cause. If the error occurred on a data backup, consider taking a data backup to create a new base for future differential backups. (Microsoft.SqlServer.Smo)

This was really an interesting error for me and had  no idea why i am getting this error while taking backup ,but i noticed one thing in the error message ' Typically, the cause of this error is insufficient resources' , Resources ehhh , whats thats??
So i started with basic check

Is there enough CPU ?? Yeah there is plenty enough 
Memory?? Enough free memory is there
Disk ?? yess.. enough to take another 30 backups
Then what else????????????????????
I missed one important thing in error message 'error 9002'
When log file is full database engine  throws error 9002
Yes there it is.... my log file is full and auto growth is disabled


But how come log space will make my backup fail?? anyway lets  give a try and initiated a log backup

OK there is no issues with my log backup and it completed successfully.. now  let me try for a full backup

There  goes my backup status 10 20 30 40 50 60 70 80 90 100 and completed successfully :)

So how come log space will cause backup failure??

So my understanding of this error we faced is that clearing differential bit map will be a logged operation so in our case there was no space to write to log file also we know a checkpoint will be triggered  when we take a backup and during checkpoint log records from log buffer will be written to log file so in this case since our log file was full and checkpoint was not able  to write log records to disk and once we took log backup there was enough space in log file and every thing went smooth then


Tuesday 19 January 2016

Scripting out a Database without data

I got a request from development team that they want the structure of a database to be migrated to a different instance   and they  were specific that they don't want it to have any data , so let see how can migrate a database without data

First lets Connect to source instance and script out the database as shown below

1)

This will open up a window which will help us to generate script
2)
     

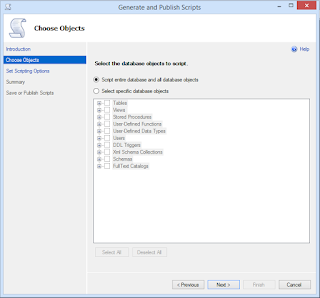
3)From the below screen you can choose whether you want entire database or specific object , here i have chosen entire database

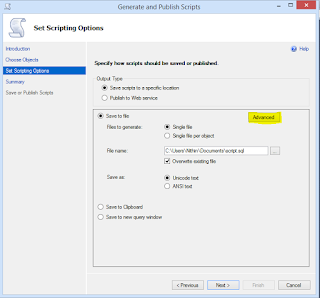
4)In this page we can select how we want the output script, here i am scripting it out to an output file  and then chose the advanced option , here we will chose whether we want to script out complete data or just schema or entire database


5)From the advanced options select schema only


6)In the next page we can review the options we have selected

9) Now we have generated the schema only script of the database


Now Connect to to destination instance you want to create the database open the script and change the data file and log file path as of your destination instance and run the script and its done :)

Tuesday 12 January 2016

Configuring Logshipping


Log shipping works on log backup and restoration , where log backup is taken in primary database , copied to secondary database and restored in secondary database in non recovery or standby mode so that further log backups can be restored

So we can split log shipping in to 3 process

1)Log backup in primary
 
       There will be a log backup job in primary server so this job will take log backup based on the schedule we have given

2) Copy from production to secondary server
 
     This job is located in secondary server and it will copy the log  backup from primary server to secondary , for this secondary server sql agent's service account should be having the read permission in the folder where log backups are kept in primary server

3)Restoring log backup in secondary server
 
     This job is located in secondary and it will restore copied log backup in no recovery or stand by mode

We have job in log shipping to do these process
1)Log backup job (In primary)
2)Copy Job(In secondary)
3)Restore job(In secondary)
4)Alert job(Raise alert in primary and secondary when backup or restore doesn't complete sucessfully within a specified threshold)

Now lets look at how to configure log shipping

Before we begin

1)Before configuring Log shipping make sure your primary database is in full recovery model if not change it to full recovery model with below TSQL
 ALTER DATABASE [database name] SET RECOVERY FULL WITH NO_WAIT
2)I normally take a full backup of primary database and restore in secondary with no recovery        manually before configuring  log shipping as i feel more comfortable with it if you want you can do this while configuring log shipping

Configuring log shipping

1)Log shipping configuration can be opened from database properties[right click(database)->properties] or from [right click(database)->task->ship transaction logs

2)Check Enable this as primary database in log shipping check box as show in below image


3)Now let us do backup setting ,click on backup settings

  • Here we need to specify the network path of the backup folder and service account of  sql agent of primary should be having read write permission and secondary instance should be having read  permission in this folder
  • If the backup path is on primary server you can give the local path even though it is not mandatory
  • You can specify how old log backup should be deleted and the threshold of alert
  • Now decide how frequently the backup should happen and schedule the backup job

Now we have done the backup configuration

4) Now lets add secondary instance and database by clicking add button

    4.1 Initialize the secondary database you can do it by taking a fresh backup or by using an already             existing backup or chose already existing database if you have restored database before                       configuring log shipping

   4.2  In the copy file setting specify the folder in the secondary server the backup to be copied and               how frequently the copy should happen


 4.3 In the restore transaction log tab you can chose whether you want the secondary database to be in        restoring mode or standby mode and specify how frequently the restore job should happen


   Click ok  and we have successfully configured log shipping